|
|
|
|
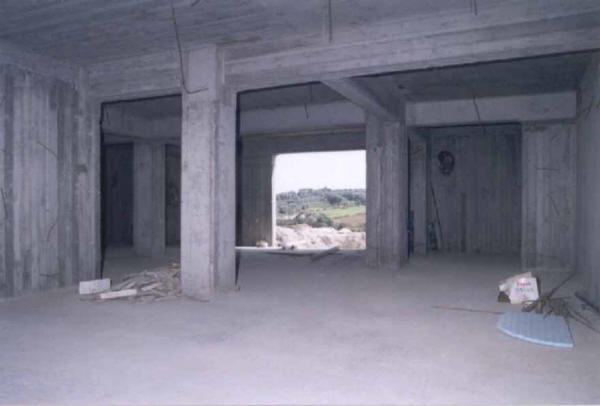
A solid concrete construction complicated by various concrete support columns and horizontal beams placed several restrictions on the studio design. The basic criteria were: the largest possible live area, left/right mirror image symmetrical control room, a machine room and a mic cupboard plus ancillary rooms to include: entrance hall, rest room/kitchen and of course a bathroom. The photograph was taken from what would become the back of the control room
After many different versions we eventually settled on this floor plan as the best use of the space. The 35 square metre live room benefits from natural daylight, a glimpse of the outside can also be seen from the control room mix position.
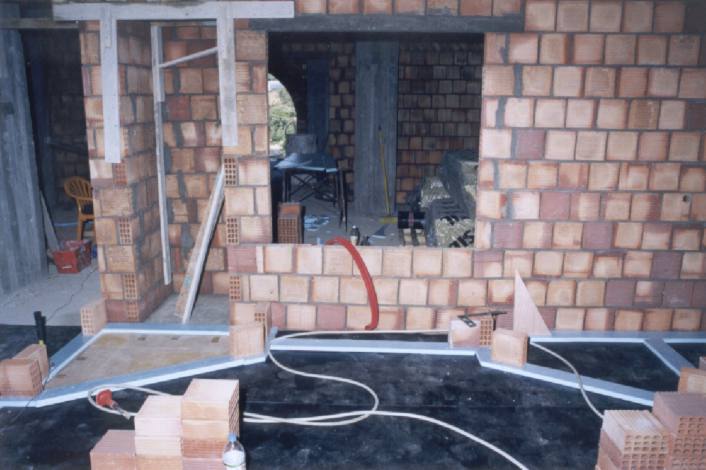
A 4mm bituminous rubber dead sheet was laid before work on the isolated control room walls commenced. Neoprene is often specified as an isolation medium but, after extensive load testing, we choose the dramatically cheaper option of 30mm fire retardant dense Styrofoam. Made by Dow Chemicals and sold under the trade names Wallmate and Roofmate the blue Styrofoam is light and easy to cut with a serrated knife. Strips of Styrofoam, weighted down with bricks, mark out the control room front walls ready for the bricklayer. In the left hand triangle is a cardboard template. This was used on both left and right sections to ensure an exact mirror image and maintain the critical alignment of the 30 degree angled walls.
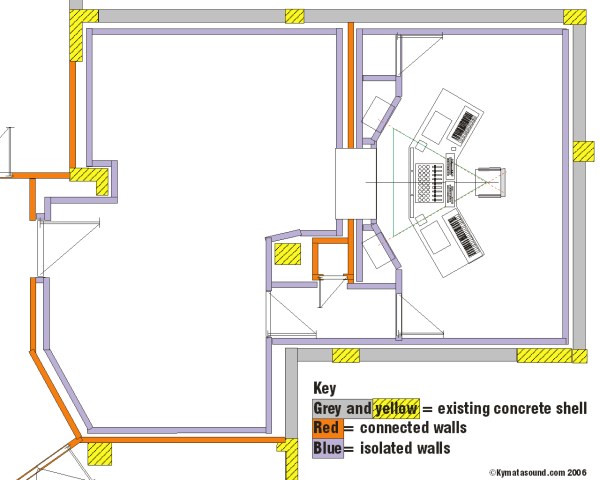
Simplified schematic of the typical room-within-a-room technique Although concrete is obviously very dense, sound impinging on its surface is readily transmitted throughout the whole structure. We therefore choose the typical room-within-a-room construction method to increase the isolation between the studio and the rest of the building.
Oversized substantial MDF boxes were constructed for the main monitor housings and rigidly mounted to the concrete plinths below. The height and tilt angle of the boxes was designed to minimise reflections from the desk whilst maintaining correct alignment of the tweeters at the central mix position. The cavity underneath the monitor boxes was lined with 60mm of 75kg/m³ mineral wool. Two brick openings were left on each side for later addition of the sealed resonant panels to complete the bass traps.
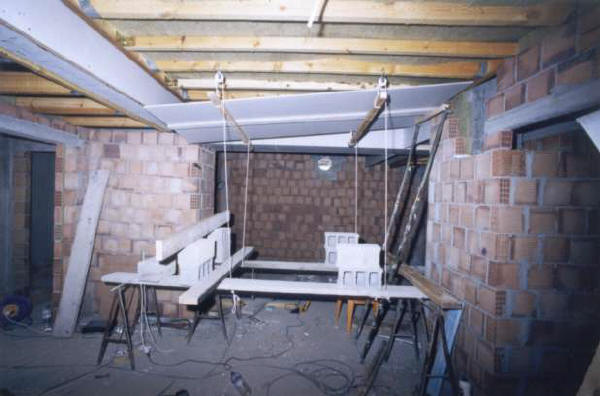
Complicated by horizontal concrete beams supporting the building above, the ceiling required careful design and construction to ensure no parts touched the building’s outer shell. A system of pulleys eased the load of the heavy plasterboard sheets. The large sections were mounted at 400mm centres whilst 600mm was chosen for the smaller sections.
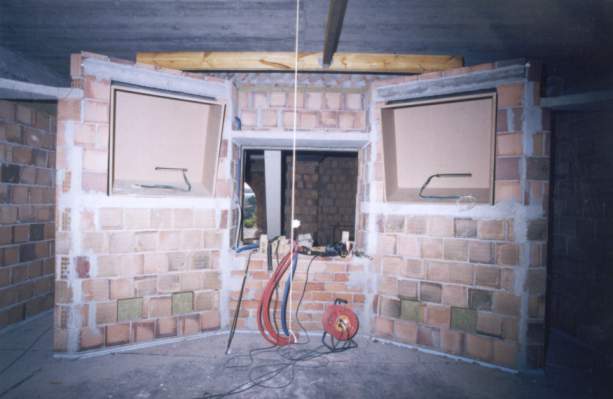
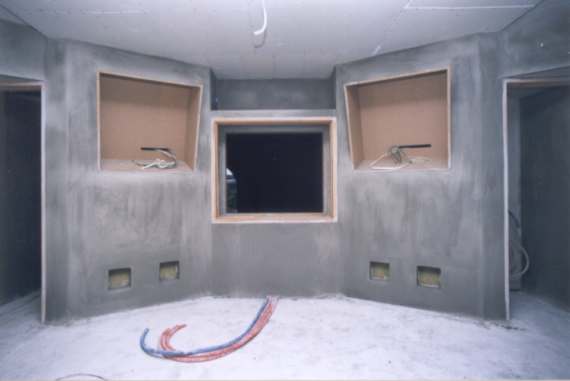
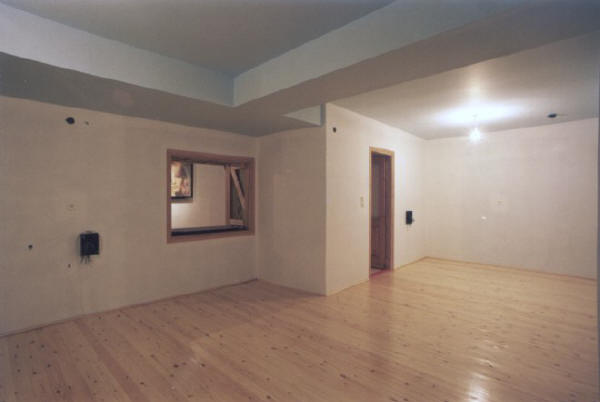
After completion of the ceiling, the door and window frames were fitted and the room was then cement rendered to a smooth finish. The red and blue plastic conduits seen on the floor carry the various cables between the control room and live area. On the left is the entrance to the control room and a mirror image door on the right gives access to the ‘machine room’.
Two low frequency Helmholtz type traps were mounted on the control room rear wall with shelving in between to help with diffusion. Plain calico stretched over a frame and painted blue completed the securely fixed wide band high frequency ceiling absorber. See the images on the equipment page for the additional acoustic treatments and bass trap construction details
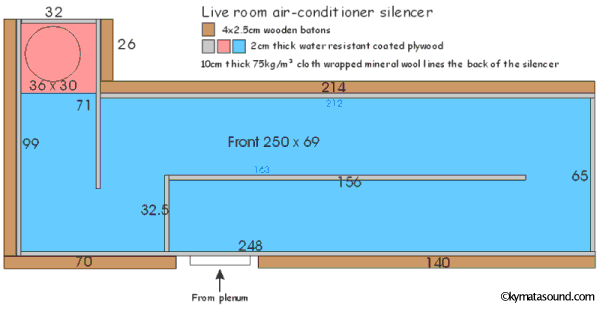
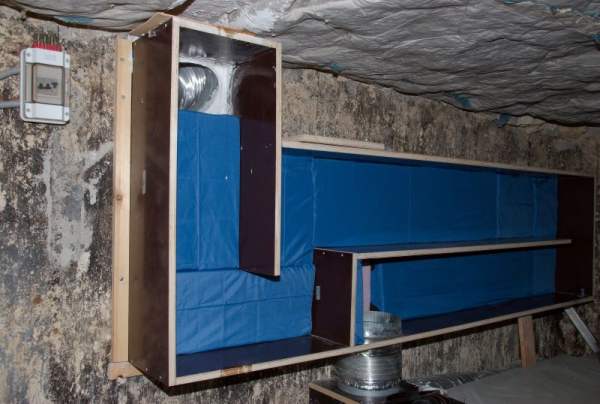
Air conditioning detailsAbove the entrance (see photo above) is the control room air-condition return vent. 30cm round cross section flexible soundproofed ducting made by DEC was fitted throughout. On all feeds and returns at least 6 metres of ducting was required to minimise noise transmission from the external air condition unit. This resulted in a mere whisper emanating from the feed ducts and only raised the already very quiet noise floor by just a few decibels. The system blows cool air into the rooms. This has the advantage over sucking air out in that it creates a positive air pressure in the rooms that helps keep dust out when doors are opened. Addendum, April 2006: although fine for the last few years, recently a stray dog destroyed the control room external flexible soundproof ducting. I have now built two substantial 2.5metre long, 35 x 55cm deep external silencers. Each silencer has 20cm of cloth wrapped 75kg/m³ mineral wool sitting in the bottom. Performance wise, these silencers have proved slightly more effective than the original ducting. With the air conditioner on, there is just a 2dB increase in the already extremely quiet ambient background level; to all intense and purposes it is inaudible. [The silver insulated pipe is the air condition feed to the machine cupboard; that’s the next job to replace with a dog proof alternative]
Control room air conditioner feed and return silencers Update, 2008: Over the winter months, the air-conditioning unit is rarely used. As a consequence, a family of rats chewed their way into the live room flexible duct and used it as their home and toilet! In an attempt to stop this happening again I replaced the supplied flimsy plastic plenum with a more substantial wooden one I made from the usual waterproof coated ply:
(top inspection cover removed - not quite visible in the photo, the outlets have fine wire mesh fitted) I also replaced the live room flexible ducting with a new rat proof silencer I designed to fit the rather cramped space:
The photo shows the cloth wrapped mineral wool lining the back of the silencer:
(front cover not fitted)
Glass and Doors
The window between the control room and live room was fitted with10mm laminated glass on the live room side and standard 12mm plate on the control room side. The gap between the (angled) panes ranges from about 450mm to 720mm. The rebate was dressed with black painted calico wrapped pegboard. Behind the pegboard (sides and top) there is 3cm of 75kg/m³ mineral wool. The trough under the window, between the two sheets of glass, is lined with mineral wool and has 150mm of sand in the bottom.
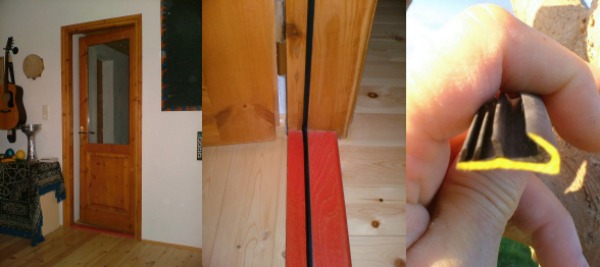
All internal doors are solid pine with standard (2x4mm glass) double glazed panels. A wooden ‘kick strip’ (stained red) was installed across each door threshold to facilitate fitting of the all round rubber seal that provides an airtight seal when a door is closed. The ribbed left hand side of the rubber seal fits neatly into a groove cut into the frame; no nails, screws or glue required. Isolation between the two rooms measured 66dB. Measurements were taken from the mix position in the control room (about 1.5 meters from the glass) and one meter the other side of the glass in the live area. Control room work surface
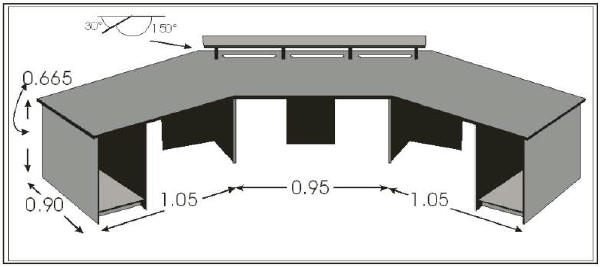
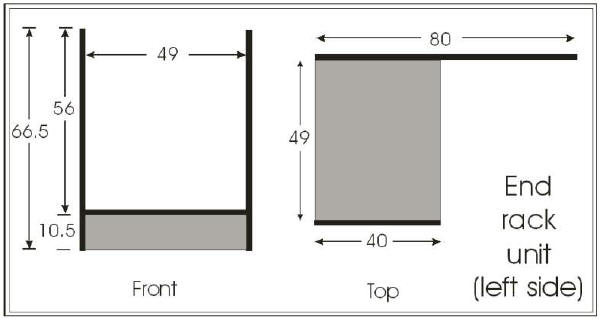
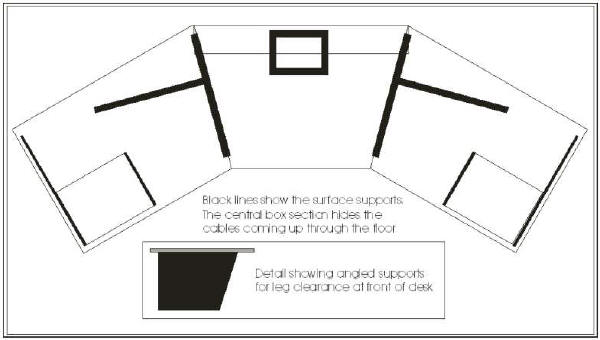
Unable to locate a suitable, reasonably priced, ready-made work surface we designed and built our own. The top and main supports are 2.5cm thick (black, light crackle finish) melamine covered chipboard and 1.5cm thick for the end rack units. Basically a large table with: 30 degree angled wings, a flying bridge to raise the TFT monitors above the mixer (with holes beneath the bridge to hide cables) and equipment racks under each end. Total cost, 234 Euros. A substantial saving over typical ready made units and made to measure too.
Additional notes - by no means definitive: DYOR All Styrofoam is being used for mechanical and/or thermal isolation; not acoustic isolation for which it is unsuited. Your requirements for acoustic isolation re the outside world may be different to mine. Mass is the only practical acoustic isolator. All holes in the structure (ventilation, electrical boxes/conduits etc) have the potential to seriously compromise acoustic isolation and must therefore be very carefully considered. Many DIYers will erect wood studwork/plasterboard themselves but won’t attempt brick/block work. Employing a professional bricklayer can be substantially cheaper than the cost of materials required for erecting wooden studwork and coving it with multiple layers (one isn’t enough for most situations) of plasterboard and sealing all the joins with mastic etc. Acoustic treatment and soundproofing are two different disciplines. When adding acoustic treatments to a room (bass traps/high frequency absorbers/diffusers) you can’t have too much bass trapping but you can overdo high frequency absorption. Diffusion isn't so important in small rooms; ie don't copy what you have seen at Air/Abbey Road etc and expect it to work in a domestic sized room. Shameless plug: Nishikigoi Varieties is a 90 minute visual bonanza of beautiful koi carp…read more
|
Feedback, questions and comments welcomeLast updated: 2 January 2010Privacy PolicyPowered by admin© |